No Motobike Manufactor have had involvement in this product.
The use of a manufactures name and / or model designation to describe the
motorcycles on this site does not imply that the manufacturer endorses
the use of this application.
Mapa Editar
This
description was created for the
Windows version of TuneECU and can be applied
largely on the Android
version.
Learning video on You Tube in English
On
selecting the mapping mode for the first time, TuneECU will
ask for a map file (.hex file, downloadable on the Net)
or read directly from the ECU. On
restarting TuneECU the last opened map is displayed.
You must select a mapping that
matches your model of motorcycle and its configuration (eg. type of
exhaust).
<MENU> Display- Map Infos
When you
select a map as
in Figure 6, details of the map (such as motorcycle, etc) are displayed
and can be updated (freeform text box) and saved as part of the map
(.hex) file.

Fig.
6
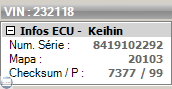
KEIHIN
- Select a Map:-
<Menu>-File -
Open Map File: and
select an appropriate map to load from storage device.
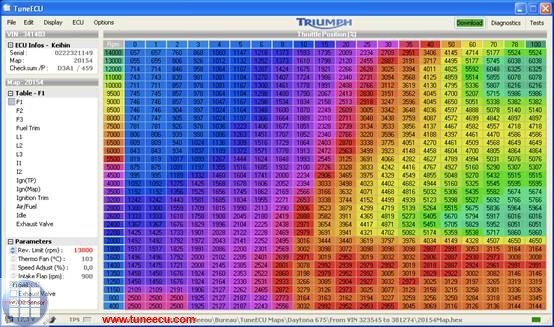
Fig.7
Fig 7: (Top Left) ECU information: Serial Number, map ID number, checksum and meter reprogramming.
|
|
Serial, mapping, checksum (check sum) and counter reprogramming. Click in this field to see information from the second ECU (K?M 690). |
Below
this are various tables that make up the map (click to select):
-
F1-4:main fuel table for cylinder 1 to 4 / RPM & butterfly opening or F3-1 corresponding to the position of
the mapping switch on the K?M 690. -
Fuel trim: Adjustment for the Fuel table F (in %).
Right click on a F table, if not visible, e.g. K?M 690 -
L1-4: fuel tables for low throttle opening (RPM & engine load, derived from manifold air pressure),
L3-1 for K?M 690
These tables are used instead of the main fuel tables at low throttle positions.
These tables are indexed by manifold air pressure. -
I1-4: the tables for ignition advance, I3-1 and I-LOF (Low Octane Fuel) for K?M690
I-Tables, Daytona 675, at these model, are the I-tables depending on the selected gear.
I (1st) = 1. gear, I (2 - 5th) = 2. - 5. gear, I (6th) = 6. gear and I (N) = Neutral -
Ignition trim: Correction of ignition tables ( degrees°).
Right click on a I table, if not visible, e.g. K?M 690. -
Air/fuel: the ratio mixture of air/fuel (AFR)
-
Engine idle: Idling speed as a function of the temperature.
-
Exhaust Valve (Daytona 675): the position of the exhaust flap/rpm.
-
Second butterfly ( Daytona 600, 650, Rocket III & K?M):
the position of the second butterfly depends is on the rpm and gear ratio.
-
Change-over F-L: the transition of the tables F after L and vice versa (RPM vs. throttle % open).
-
ETV = Electronic Throttle Valve:
The ETV tables are only tables for the gear ratio of the throttle grip to the stepper motor that moves
the throttle valves (0-100%).
These tables are for the different driving modes (e.g. Rain, Tour and Race) for the ETV models e.g.
from Triumph, there are further tables for each selected driving mode, which operate depending on
the gear selected.
For the following description, the map of a Triumph Street Triple 765 was used as an example.
Stepper value 0 in the ETV table = throttle valves closed.
Stepper value 1680 in the ETV table = throttle valves fully open (100%)
The stepper motor on this model has 1680 steps as a step to open the throttle valves 100%.
Means: 100/1680 = 0.058 .. - The stepper motor can vary the throttle position to approximately 0.06% accurate.
For Benelli models: TnT Sports, TNT CR, TreK1130, TnT standard (05/06) and TNT R160.
For the models, TnT Sport , TnT CR, and TnT TreK1130 standard (05/06), Map1 (I & F)
the maps is for reduced fuel consumption = reduced performance. Map0 (I &F) is for open
performance and maximum torque.
For the TNT R160, Map1(I & F) is for use with DB-killer, and Map0 the map is for operating
WITHOUT DB-Killer, Map0 (I & F) is not suitable for use with DB killer. (Source http://www.benelli-info.de) -
The parameters and devices of the Mappings:
RPM rev limiter, temperature trigger (fan), Road speed reading correction (range of 0% to -6% correction),
Limiting speed (Rocket III), Air Flap & Exhaust Valve Daytona 675, cutoff time Quick Shifter (Daytona675
from model 2009), injector flow rate and A / F target (Sagem).
The status bar displays the battery voltage, condition of the injection system (operating in closed or open
loop), adaptation state for the TPS (Keihin), storage drive location and filename of the loaded map.
Note: Not all parameters for all bike models available. -
Setting parameters and switch on or off the devices such as SLS, O² sensor, etc.
Note: There not any parameters and devices in all bikes are available.
|
|
Double-click the desired parameter and change it according to your wishes. Use the Esc key to undo the changes to make. Otherwise, the new values will be automatically used as default values. The revised map must be saved in spite of this and can then be uploaded to the ECU. For turning on or off a device (eg, the SAI) with the left mouse button on the Device make a double-click or click the device with the right mouse button and select "Enable" or "Disable". Caution: Do not disable the secondary butterflies (K?M) only if the butterflies or the secondary system (motor PAP and second GST (TPS) ) are removed. |
The
parameters for the two Benelli
1130 Map's (Map 0 and Map 1) can be changed separately,
select the table 0 or 1 (F or I), so you can access to the appropriate
parameters.
The display "parameter" changes automatically depending on the chosen F
or I map,
to "parameter (Map 0)" or "parameter (Map1)".
<Menu>-File -
Open Map File: and
select an appropriate map to load from storage device.
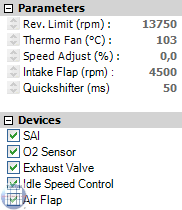
Fig.7a
Fig. 7a: (Top Left)
ECU
information: Serial Number, map ID number,
checksum and meter reprogramming.
Below this are
various tables that
make up the map (click to select):
-
F: the main Fuel table ( rpm and throttle position %).
-
Fuel trim: Correction of the fuel tables F (in %)
-
I: ignition advance tables
-
I Limit: ignition Limit
-
I Idle: ignition Idling
-
I Idle (N): Ignition. The (N) table is used when the bike is in neutral.
-
Ignition trim: Correction of ignition advance table I (in °).
-
A/F1: Air/Fuel mixture based on engine load (in %) vs RPM.
-
A/F2: Air/Fuel mixture based on the RPM. The A/F 2 table works the same as the A/F 1 table
when the motor is at full load. Full load and full throttle are not the same. Load % is derived
from the difference in readings between the Manifold Air Pressure and atmosheric (airbox) pressure. -
Idling: idling speed according to temperature.
-
Warming-up phase: Air/Fuel mixture dependent on the engine temperature.
- ETV = Electronic
Throttle Valve:
The ETV tables are only tables for the gear ratio of the throttle grip to the stepper motor that moves
the throttle valves (0-100%).
These tables are for the different driving modes (e.g. Rain, Tour and Race) for the ETV models e.g.
from Triumph, there are further tables for each selected driving mode, which operate depending on
the gear selected.
For the following description, the map of a Triumph Street Triple 765 was used as an example.
Stepper value 0 in the ETV table = throttle valves closed.
Stepper value 1680 in the ETV table = throttle valves fully open (100%)
The stepper motor on this model has 1680 steps as a step to open the throttle valves 100%.
Means: 100/1680 = 0.058 .. - The stepper motor can vary the throttle position to approximately 0.06% accurate.
Changing
values and parameter of tables (advanced user):
It is advised against making
changes to the following values as the installed map is optimised for
your setup.
- F
- Fuel trim
- I
- I Limit
- I Idle
- I Idle (N)
- Ignition trim
However
if
you have a dynamometer, it is always possible to adjust the
values to achieve better performance,
knowing that the best power is obtained with an AFR value of 12.8 and
14.7 for lower consumption.
Other tables can be
modified according to your preferences:-
|
A/F1: |
Air/Fuel
mixture in
the relationship engine load (in %) to the rpm. |
|
A/F2: |
Air/Fuel
mixture in relation to the rpm. The A/F 2 table works the same as the
A/F 1 table when the motor is at full load. Full load and full throttle
are not the same. |
|
Idling: |
Idling
speed dependent on the engine temperature |
|
Warming-up
phase: |
Fuel/air
mixture dependent on the engine temperature. |
Changing values and parameters of a
table (advanced user):
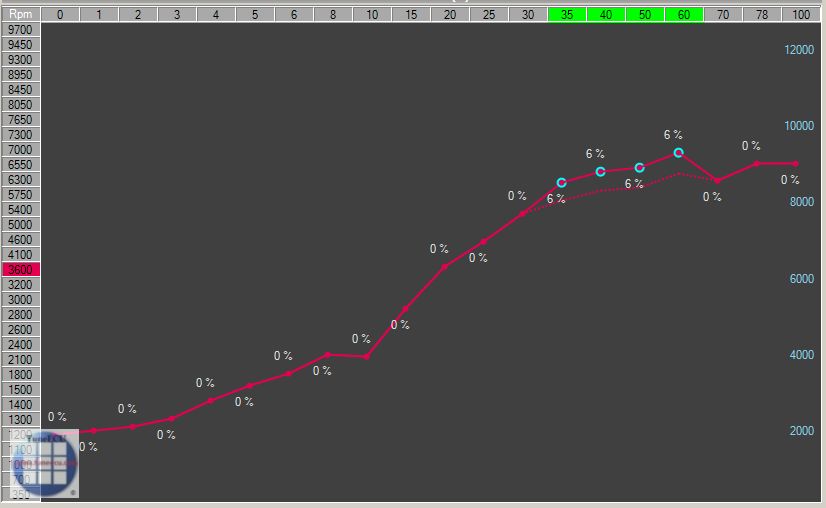
Fig.8
Value of a table (Fig.8):
Select one cell value by a single
click on a cell, or multi-selection of adjacent cells by click/hold
left mouse button and drag. Increase/decrease value (s) with the
(mouse) onscreen display up/down arrows.
Use
the arrow keys from the keyboard, you can jumping from version
1.8.5 from a single selected cell in the adjacent
cell.
New
feature from release 1.6.1, You can select
individual or block or cells and adjust by %
Toggle F4 returns to incremental value mode . (Fig.8a)
Fig.8a
The values before the
change can be displayed by pressing and holding the F6 key.
Parameter
(Values)
Mapping:
Click on the parameter and
change onscreen with mouse.
The ESC key cancels changes if the new values are validated by default.
The values before the change can be
displayed by pressing the F6 key.
New
feature from release 1.8
One or Multiple cell
can be copy/pasted, after selection – right click to access the
copy/paste menu.
Select the first cell or multi select the value to be pasted and Right click.
 Note: The values
that have changed in the table, are shown in white color.
Note: The values
that have changed in the table, are shown in white color.
(Version 1.8.5)
Modification in graphical mode
The selected points can be now move with the mouse.
Save
the modifications with a right click on an another rpm curve to modify
or with the 'Enter' key, press the 'ESC' key to quit the modification
mode without saving.
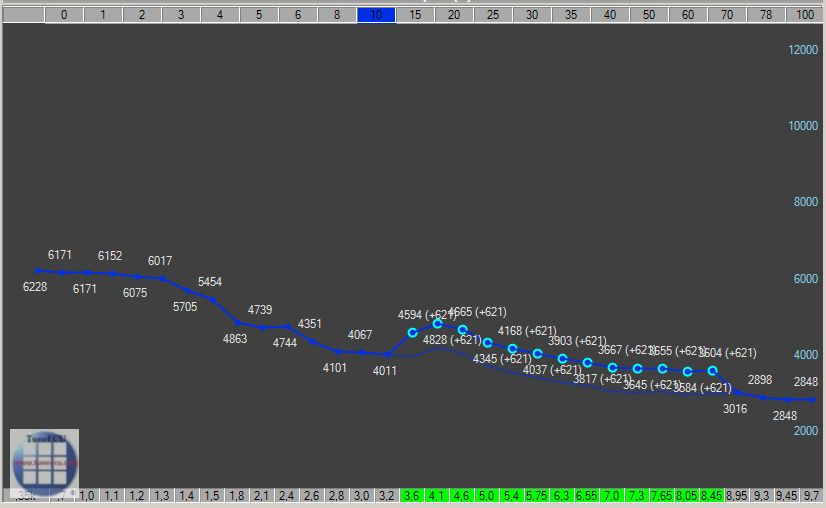
You can also modify a TPS
curve with a right click on a TPS axis
value, then select the rpm point to modify at the bottom of
the graph.
To select or deselect a area of points, click on the first value and
shift-click on the last.
The F curves can be move in % or absolutes values, the 'F4' key allow
you to toggle between this 2 modes.
By
holding the shift key pressed while you move the curve with the mouse
(or the wheel), the absolutes values are increased (or decreased) by
10. (values multiplied by 1000, eg 4.6 =
4600 rpm).
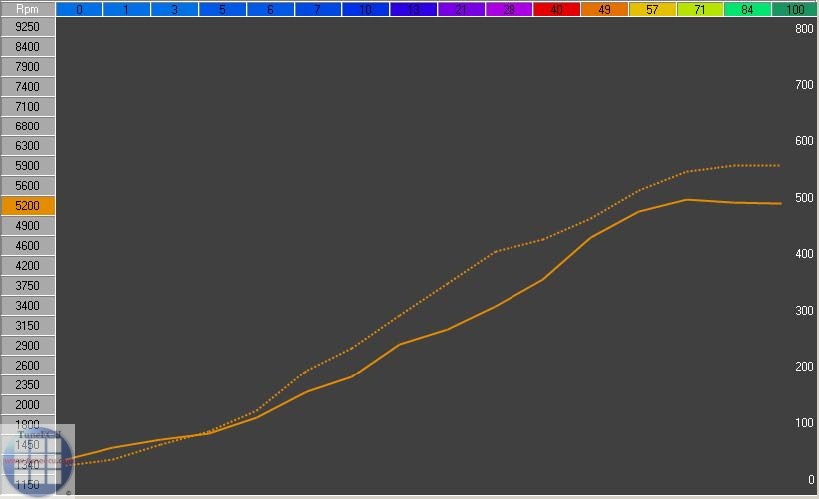
Compare
to another mapping <Menu>
File-Compare File:
Select another map for comparison with the currently loaded map.
Then
press and hold the
F6 key to display the values of the compared
map.
Then
press the
F6 key to display the values of the compared
map.
If you press the F6 key
again, you
return to the current
loaded map.
the other map (currently loaded map).
Comparison
can also be displayed in
GRAPHIC mode (F5 key-see Display-Graphic mode below).
Compared
table is displayed as dotted.
The currently displayed
filename is shown in the Status Bar.
To exit comparison, select this menu again and select CANCEL at the
file selection dialogue box.
Importing a PCIII or
PC-V table
(PowerCommander 3 or 5)
<Menu>
File-Import PC Table (.djm table or .pvm table):
Applies *F-corrections* from a PCIII or a PC-V table in the
"F-Trim" table.
If available the Ignition table** will be imported into
the I Trim table.
* includes support of "cylinder
Advanced" feature, but not the "Gear Advanced", in this case
you must
choose the "Gear" table to
import.
** Only the first Ignition table will be imported.
For KTM User:
TuneECU follows the KTM convention, and commits the Trim 1 to F1 (F1 in
TuneECU = rear cylinder).
PowerCommander
not follows
the KTM convention, in the cyl.
selective PCIII- or PC-V map the table1
is the front cylinder.
You must change the values in the PCIII- or PC-V Map before you import
the cyl.
selective PCIII or PC-V map
with TuneECU.
For Sagem User:
Unfortunately,
there is a small problem, TuneECU can probably import
"cylinder-selective PC-Files" to a Sagem-map, but from these
"PC-Files", only
the first trim table in the main table (F-table) it is transferred.
This means that before importing such a PC file, this PC file from
"selective cylinder file" to "BASIC file"
must be converted. This conversion can be performed with the Power
Commander software.
Saving
the Mapping: <Menu>
File-Save Map File
With
Bluetooth connection, the map reading and reprogramming functions are
not available for many models. Exceptions are in the compatibility list.
The modified mapping may be saved to
disk
Nb. To preserve the
originally loaded map, <MENU>
FILE SAVE and save as a different
filename.
Remember to update the MAP INFO text box to describe the
updated map.
Exit the
Program <Menu>FILE-
EXIT:
This action is not possible if a download is in progress.
 |
|
Display
<Menu>
DISPLAY-Graphic or (F5)
key : toggles a graphical display (Fig. 9) of each table.
F7 key
shows the curves representing the values of the table for each opening
throttle.

Fig.9
In this (F5) viewing mode, select and hold left mouse button along adjacent value/s of engine speed (RPM). Only the corresponding ranges of curve(s) are displayed, along with (outlined) curve/s of pre-modification or a loaded comparison map.
(F4 key) auto-display curve
Press F4
to toggle displaying either single or multi-curves as the mouse pointer
is click-dragged along left RPM column.
The Status bar lists filenames.
F6
allows you to view, in outline,
the current table before modification or map file selected for
comparison.
Comparing Maps Graphically for a Given
Throttle Position:
Click
on any throttle position to see a comparison between the two maps. Drag
the mouse up and down the throttle range to see the graph change in
response.

Display Map Information and Logs <Menu>
Display-Map Infos:
Open a window (editable) to describe the map.
<Menu>
Display-Logs:
Opens a window with an overview of the dialogue between the software
and the ECU.
Connecting to the ECU <Menu> ECU-Connect:
If the connection does not happen automatically
History (Sagem) <Menu>
ECU-History:
Displays a window of the logs for the latest map reloaded into the ECU.
See
mapping
Read
Map <Menu>
ECU-Read Map:
With
Bluetooth connection, the map reading and reprogramming functions are
not available
for many models. Exceptions are in the compatibility list.
Reads and displays the map in the
ECU for a possible backup (<Menu>
File-Save Map File).
KEIHIN:
This process can take
20 minutes, so it is essential to remove the fuse/s for the lights, and
connect
a
charger to the battery, better yet a second 12
volt battery
from a car. Nb. On some bikes, disabling
the lights by removing fuses
will prevent the bike from running.
As is indicated in
parentheses (Fig. 10), the base map is 20152 in this example.

Fig.10
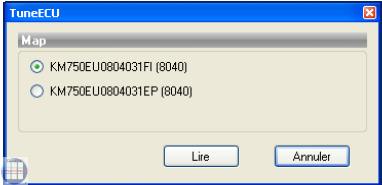
Fig. 10a
OK
reading the map, in parentheses, the ID of the base mapping (Triumph).
KTM 690 on select maps to play
( FI or FI). Fig.10a
FI
is a acronym for EFI
= Electronic Fuel Injection
EP is a acronym for EPT = Electronic
Power
Throttle
The
progress of the download is displayed in the Status Bar. Fig. 11).
The
operation can be aborted by clicking on the Close window button.
The mapping must be stored in advance in order to reprogram the ECU.
Attention!!
For KTM690 models, order of operations note:
First flashing the EP-map, after the flashing of the EP-map, turn off ignition, wait about 10 seconds
and switch on the ignition again, slowly rotate the Throttle until full throttle then slowly close the throttle,
turn off the ignition.
Only now flashing the FI map, after data transfer is a reset the adaptation required.
![]()
Fig.11
Reprogramming
of the ECU (With TuneECU for Windows, ie.
“Downloading” from PC to ECU)
With
Bluetooth connection, the map reading and reprogramming functions are
not available
for many models. Exceptions are in the compatibility list.
Your
battery must be fully charged before doing any mapping work -- ideally
connected to a battery tender, better yet a second 12 volt battery from
a car.. Your laptop must be connected to
the power
supply.
<Menu>-ECU
Download
or click the green button "Download"
(Fig. 7a) top right corner,
(“Map Edit” changes to
green “Download”
when
ready to send to the ECU).
This action
asks for confirmation
before launching.
Reprogramming of the ECU (With TuneECU for android):
Android version with cable connection:
- start TuneECU
- allow the application to use the FTDI cable
- In the "ECU" menu, use the "Select" option to select the type of ECU (for example, Triumph Keihin).
- Turn on the ignition.
- In the "ECU" menu, select the "Connect" option and wait for the flashing red status light on the bottom right to start flashing green.
- open in the "map" menu the desired map
- In the ECU menu, select the "Reprogramming" option.
Android version with Bluetooth
connection:
Note:
With the Bluetooth connection (only possible with the
Android version),
the ECU card reading function is not available and the Reprogramming
via Bluetooth function is only available for models indicated by the
programmer in the list of bikes.
- start TuneECU
- Turn on the ignition.
- When you start
TuneECU for the first time, select the Bluetooth adapter to use. During
a subsequent start,
all that remains is to confirm whether the application is authorized to activate Bluetooth. - In the "ECU" menu, use the "Select" option to select the type of ECU (eg, Triumph Keihin).
- Select "Connect" in the "ECU" menu
- When using a compatible Bluetooth adapter, the indicator flashes blue, then red and yellow when establishing the connection. When the connection is established, the indicator flashes green.
- In the map window, open the desired map via the "Map" menu.
- In the "ECU" menu, select the "Reprogramming" option.
For these models, special Bluetooth adapters such as "OBDLink LX" or "OBDLink MX" or "OBDLink MX+"
are required, the other adapters do not work.
It is not possible to read the befidlichen on the ECU card with Bluetooth.
Attention! For KTM 690: The FI and EP mapping must match on a KTM 690.
For
the KTM 690 both cards are always required (FI and EP-Map)
Attention!!
For KTM 690 models, order of operations note:
First flashing the EP-map, after the flashing of the EP-map, turn off ignition, wait about 10 seconds
and switch on the ignition again, slowly rotate the Throttle until full throttle then slowly close the throttle,
turn off the ignition.
Only now flashing the FI map, after data transfer is a reset the adaptation required.
Walbro ECU (Benelli TNT, Tornado 130
& TREK):
Note: For the Walbro
models is when using TuneECU for Android, still a converter cable,
FTDI-USB-RS232,
required.
Follow strictly
the instructions on the screen to keep it the 2-pin connector ready and
connect this,
when the program tells you to.
Verification
of compatibility between the ECU and mapping is done. The progress of
the download
is displayed in the status bar (Fig. 11).
At
the end of the download, a message is displayed if the transfer
completed successfully.
ATTENTION!
Walbro ECU:
Remove the 2-pin connector before turning
off the
ignition.
If
the download fails (Fig. 12):-
For
Sagem and Keihin models:
With
Bluetooth connection, the map reading and reprogramming functions are
not available
for many models. Exceptions are in the compatibility list.
1. Click OK.
2. Do not disconnect the cable.
3. Turn off the ignition.
4. Turn on the ignition.
5. Wait for TuneECU to connect to the ECU.
6. If the Download button is green, start the download again.
If not, wait for the recovery option to appear (Fig.
13)
or
do : <Menu>
ECU-Recovery
of the ECU
Note:
For this process, in TuneECU must a suitable map to be open, at the
best an OEM map.
.
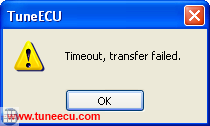
Fig.12

Fig.13
At
the end of the download, a message is displayed if the transfer
completed successfully. (Fig. 14)
ATTENTION!
Walbro ECU:
Remove the 2-pin connector before turning
off the
ignition.

Fig.14
Recovery of the Walbro ECU models (TuneECU
Windows vers)
Note: For the Walbro
models is when using TuneECU for Android, still a converter cable,
FTDI-USB-RS232,
required.
- Wait
for the message "ECU not responding ..." and select Cancel
- Select menu "ECU" <Recovery>
- Always
follow the instructions on
the screen.
On the
final process,
the final message "ECU
fully restored"
Confirm by clicking "OK"
The following changes apply to the Android version
of TuneECU and Walbro ECU
Recovery of the Walbro ECU models (TuneECU Android_vers).:
- Menu "ECU" <Select> Benelli 899/1130 (This item appears only if you have a USB cableplugged on the android device)
- Menu "ECU" <Connect>
- Wait for the (first) message "ECU is not responding ..." and select OK
- Select menu "ECU" <Reprogram>
- Follow the instructions on the screen.
(of course you must be in the Map screen with a Map for your bike opened)
Reset Adaption Keihin only - Triumph models (not applicable for the Sagem models):
After
downloading (Fig. 12),
a reset of the adaption is required.
Turn off and on the ignition, wait
ten
seconds and turn ignition off again.
Now turn on the igniton again.
Wait until with the connection re-established
with TuneECU proceed :-
<Menu> ECU Reset Adaption
Then start the engine and
let idle until the “TPS” status indicator (in the status bar) changes
to green (after 15
to 20 minutes).
Reset
Adaption and/or initialization-run - Keihin ECU - K?M only.
After
downloading a FI-map, start the engine and run at idle (without
touching the throttle) for 15 minutes
and then the engine turn off.
990cc
models SD, SM, and Adventure:
After download from an new map, you must perform an initialization run.
The 990s must be on the center stand, and are thus stand vertically.
For SD / SM models use a Paddock Stands
or the side stand with a piece of wood underneath.
The engine must be cold.
There should be the coolest possible air temperature outside, this can
be very helpful for a lower fuel
consumption.
Start the engine and let it run at idle for 15 minutes. During these 15
minutes, not use the throttle or
any other functions.
The 15 minutes need to be strictly adhered to, and must not fall below.
The time can only be exceeded by
a maximum of one minute.
Should the engine go out, then re-start ONLY, do not begin 15 minutes
again. (Source: German K?M Forum)
If you want to perform an
initialization run only, you must first reset in any case the
adaptation.
(Source: LC8 German K?M Forum)
New in TuneECU version 2.3.5 for K?M 990 & 1190
Reset
ECU after replacing or repairing the engine.
CAUTION: To
adapt the ECU to the change of parameters after replacement or repair
with
the replacement of the engine pistons, cylinders or cylinder
heads, a reset of the ECU must be performed.
If you omit this step,
the engine can have a dysfunction at idle for a long period.
- Connect the diagnostic cable, run the program and turn ignition ON.
- Wait until connection is established.
- Go to the tab "Tests" and double-click "Reset Adaptation".
- Wait for the message "Reset Adaptation done", exit the program and
disconnect the diagnostic cable.
- Run the engine at idle for 15 minutes without touching the throttle,
check the coolant temperature, stop the
engine in case of overheating.
690cc
models:
After
downloading a FI-map,
start the engine and let runnig it idle (without touching accelerator)
for 15 minutes,
then turn it off.
After
downloading a EP-map,
Following a mapping download into the ECU, turn off the ignition (key)
, turn on the ignition, slowly rotate the Throttle until full throttle
then slowly close the throttle, turn off the ignition.
Reset Adaption Triumph-Sagem-Lambda-models only
The manufacturer of Triumph motorcycles describes this process as follows:Fuel System
Adaption — e.g. Daytona 955i, Sprint ST,
Sprint RS, Tiger, TT600 and Speed Triple
(only Sagem models with Lambda)
The fuel system fitted to the above
models is adaptive. This
means that the engine management system will
self-adjust air fuel ratio (i.e.
the mixture setting) to its optimum level in order to ensure differing
running
conditions do not result in poor running.
During an adaption, the engine
management system examines
the air--fuel ratio as measured by the oxygen sensor in the exhaust
system and,
if necessary, makes an adjustment. In some cases, a single adaption may
be
sufficient but in others, more adaptions will be necessary.
An adaption take place when all the
following conditions are
met:
- Gearbox in neutral, clutch engaged.
- Coolant temperature 80 -- 100 °C
- Airbox temperature 21°C minimum
- Engine idling for 10 -- 30 seconds
Once adaption has taken place, the
settings are retained
ensuring that adaption is not necessary every time
the engine is started.
Particularly for new bikes, where the
engine has not been
run-in, it may be necessary for dealers to ensure adaption has taken
place
before handing the motorcycle over to the customer. This can, of
course, apply
at
any other times as well.
takes place automatically.
Blip the throttle every 30 seconds to start another adaption cycle.
When
coolant or
airbox temperatures are above or below adaption thresholds, allow
the engine to cool or warm-up before
continuing.
To check that adaption has been
completed, scroll the
Triumph diagnostic tool to DIAGNOSTICS--CURRENT
DATA--LAMBDA FUEL. in a correctly adapted bike, the lambda
fuel reading should show 0.0% (though
operators should note that the figure
will continue to change during engine operation but will settle at 0%
briefly
but regularly.
If reading higher than +3% or --3%
are seen continuously,
adaption is necessary and can be brought about
in the conditions mentioned
earlier (remembering that more than one adaption will be needed on
occasions).
If a stationary LAMBDA FUEL figure of
--19.6% is seen, download the correct tune for
the model in question
and begin the adaption process as described.
Finally, use of the SET LONG TERM
FUEL TRIM adjustment in
the Triumph diagnostic tool should be reserved
solely for when replacement ECMs
are newly fitted (or are transferred from another bike).
In clarification, the following described process should be not so correct.
1. Ensure bike is seeing a closed throttle position (CTP),
if not, then perform TPS reset.
2. Bike in Neutral
3. Coolant temperature between 80-96°C
4. Minimum air box temperature of 21°C
5. Now with clutch pulled, blip the throttle to 3000 RPM and let it drop back to idle for at least 30 seconds,
all with the clutch lever pulled in.
Check bike is adapted by viewing Lambda Fuel.
Figures should be "toggling" +4 to -4
Don't forgot to check IACV steps are 20 - 35
Reset TPS Aprilia, Benelli & Triumph with Sagem ECU, generally Applicable to all Sagem models:
1. In
the Test mode, double-click Reset TPS.
2. Turn off the ignition.
3. Turn on the ignition.
4. Start the engine and let it idle for one minute without touching the
throttle.
Reset
TPS Benelli Walbro
ECU (TNT, Tornado 1130 and TREK models)
Note: For the Walbro
models is when using TuneECU for Android, still a converter cable,
FTDI-USB-RS232,
required.
In testing mode, double-click "Reset TPS"
Clear fault codes <Menu>
ECU Erase Error Codes:
In "Diagnostics" or "Tests" mode, this will erase stored error codes
and messages in the ECU. If the faults that caused these error codes
were not rectified (eg. faulty sensor) then the error codes will again
be re-generated
and stored in the ECU.
Options
<Menu>
Options-Auto connect.:
If
this option is checked and the cable connected, the program will
automatically connect to the ECU and open
the default operation mode.
<Menu>
Options-Interface
Displays
the interface used to connect to the ECU, please connect to only a
single cable interface.
Attention
New in version 2.3! Select the correct
interface, for Keihin and Sagem select "USB"
and for Walbro select "Serial"- and then the
correct COM port.
<Menu>
Options-Language
Select your preferred language
(English, French, Italian, Spanish, Portuguese or German) for the
program.
By
default the software
uses the language of the operating system.
Exiting Program
<Menu> File-Exit
To close TuneECU, select Exit from the File menu.
This action is not possible if a download is in progress.
!!
Important note !!
No Motobike Manufactor have had involvement in this
product.
The use of a manufactures name and / or model
designation to describe the
motorcycles on this site does not imply that the manufacturer endorses
the use of this application.
All care has been taken in the
creation of this page, however, the author
cannot guarantee the completeness and accuracy of this
information.